Laravel in Kubernetes Part 11 - Adding Let's Encrypt certificates to the application

The next important piece, is for us to add certificates to our application, so our users can securely use our application across the internet.
We are going to use Cert Manager to achieve this, as it will automatically provision new certificates for us, as well as renew them on a regular basis.
We will use the Let's Encrypt tooling to issue certificates.
But first, we need a DNS name for our service.
For this piece you'll need a domain name. I'll be using https://larakube.chris-vermeulen.com for this demo.
Table of contents
Setting up a domain name
Setting up a domain name is fairly simple for our Kubernetes cluster
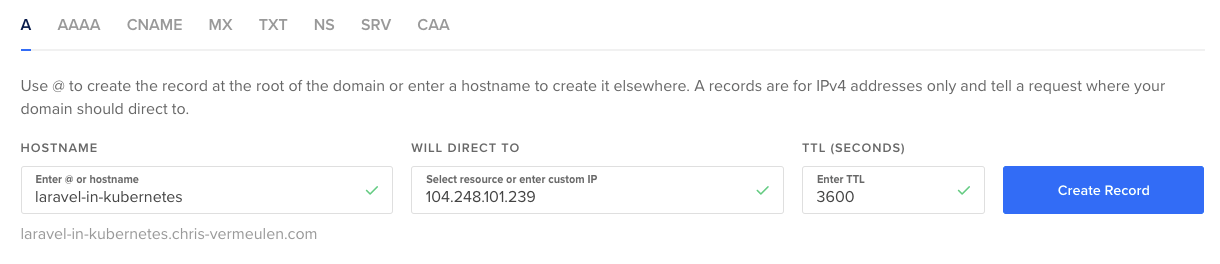
We need to point either a domain, or a subdomain to our LoadBalancer created by the Nginx Ingress
In my case, I am simply pointing laravel-in-kubernetes.chris-vermeulen.com to my load balancer.
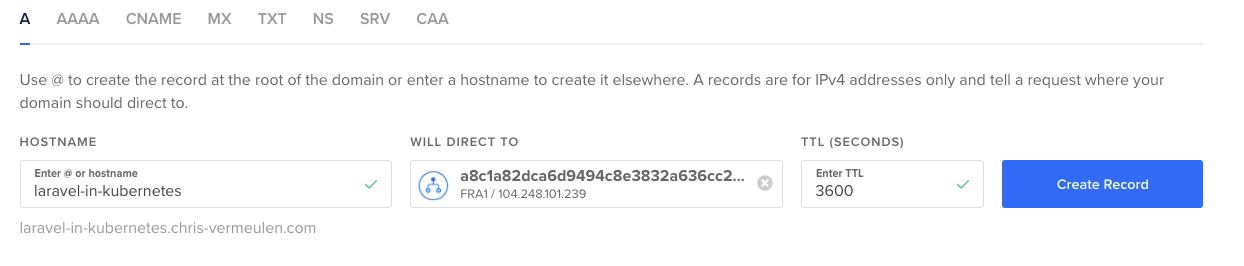
If you are doing this outside of DigitalOcean, you can also create a A NAME record, pointing at the IP of your LoadBalancer.
$ kubectl get svc -n ingress-nginx
NAME                                 TYPE           CLUSTER-IP       EXTERNAL-IP       PORT(S)                      AGE
ingress-nginx-controller             LoadBalancer   10.245.228.253   104.248.101.239   80:30173/TCP,443:31300/TCP   8d
Once you have the IP for the LoadBalancer, you can point the A name directly at it
For more stability, you can also assign a Floating IP (a.k.a Static IP) to the LoadBalancer, and use that instead.
That way, if you ever need to recreate the LoadBalancer, you can keep the same IP.
HTTPS error
If you now load the DNS name in your browser, you'll notice it'll throw a insecure warning immediately (I am using Chrome)
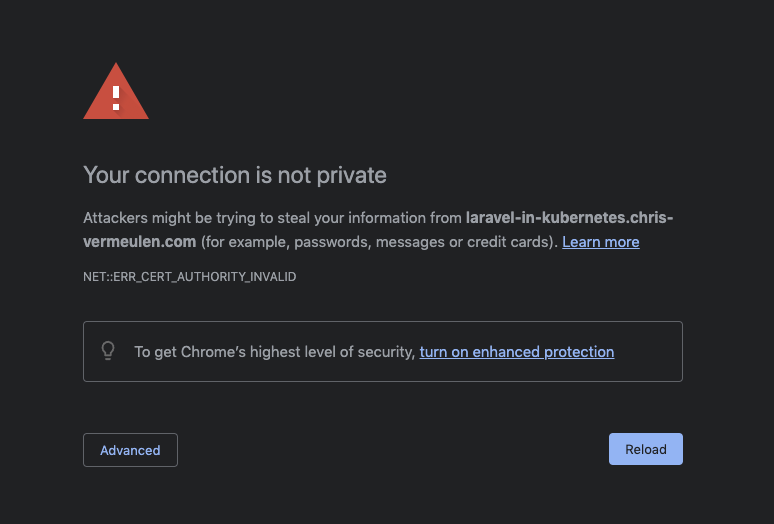
This is due to a redirect from http to https.
But this is exactly what this post is about. We now need to add SSL certificates to our website to serve it securely.
We'll issue the certs from Let's Encrypt as they are secure and free, and easy to manage.
Installing the Cert Manager
First thing we need to do for certs is install Cert manager
We'll do this by using the bundle once again.
At the time of writing the current version was v1.5.3. You can see the latest release here.
We'll download the latest bundle and install it in the same way we did the Ingress Controller
First we need to create a new directory in our deployment repo called cert-manager and download the cert manager bundle there.
$ mkdir -p cert-manager
$ wget https://github.com/jetstack/cert-manager/releases/download/v1.5.3/cert-manager.yaml -O cert-manager/manager.yml
We now have the local files, and we can install the cert manager in our cluster.
$ kubectl apply -f cert-manager/
[...]
You'll now see the cert manager pods running, and we are ready to start issuing certs for our API.
$ kubectl get pods -n cert-manager
NAME                                      READY   STATUS    RESTARTS   AGE
cert-manager-848f547974-v2pf8             1/1     Running   0          30s
cert-manager-cainjector-54f4cc6b5-95k9v   1/1     Running   0          30s
cert-manager-webhook-7c9588c76-6kxs5      1/1     Running   0          30s
You can also use the instructions on the cert manager page to verify the installation
Creating the issuer
Next piece, we need to create an issuer for our certificates.
This is for Let's Encrypt (Are any ACME issuer) to remind you about certificate renews (This will happen automatically with Cert Manager), and some other admin pieces.
I've used Let's Encrypt for years now, and never been spammed, ever.
Now the one thing we also need to do, is create 2 issuers. One for Let's Encrypt staging so we can test whether our configuration is valid, and a production one to issue the actual certificate.
This is important so you don't run into Let's Encrypt rate limits if you accidentally make a configuration mistake.
Again in the cert-manager directory in the deployment repo, create a new file called cluster-issuer.yml in the cert-manager directory, where we can configure our ClusterIssuers.
We are using ClusterIssuers to make it easy for our setup, but you can also use the normal Issuers for namespaced issuers.
apiVersion: cert-manager.io/v1
kind: ClusterIssuer
metadata:
  name: laravel-in-kubernetes-staging
spec:
  acme:
    # You must replace this email address with your own.
    # Let's Encrypt will use this to contact you about expiring
    # certificates, and issues related to your account.
    email: chris@example.com
    server: https://acme-staging-v02.api.letsencrypt.org/directory
    privateKeySecretRef:
      # Secret resource that will be used to store the account's private key.
      name: laravel-in-kubernetes-staging-key
    # Add a single challenge solver, HTTP01 using nginx
    solvers:
    - http01:
        ingress:
          class: nginx
---
apiVersion: cert-manager.io/v1
kind: ClusterIssuer
metadata:
  name: laravel-in-kubernetes-production
spec:
  acme:
    # You must replace this email address with your own.
    # Let's Encrypt will use this to contact you about expiring
    # certificates, and issues related to your account.
    email: chris@example.com
    server: https://acme-v02.api.letsencrypt.org/directory
    privateKeySecretRef:
      # Secret resource that will be used to store the account's private key.
      name: laravel-in-kubernetes-production-key
    # Add a single challenge solver, HTTP01 using nginx
    solvers:
    - http01:
        ingress:
          class: nginx
We can now create our issuers.
$ kubectl apply -f cert-manager/cluster-issuer.yml
clusterissuer.cert-manager.io/laravel-in-kubernetes-staging created
clusterissuer.cert-manager.io/laravel-in-kubernetes-production created
Next, we want to check they were created successfully.
Let's start with the staging one.
$ kubectl describe clusterissuer laravel-in-kubernetes-staging
[...]
Status:
  Acme:
    Last Registered Email:  chris@example.com
    Uri:                    XXX
  Conditions:
    Last Transition Time:  2021-09-22T21:02:27Z
    Message:               The ACME account was registered with the ACME server
    Observed Generation:   2
    Reason:                ACMEAccountRegistered
    Status:                True
    Type:                  Ready
Events:                    <none>
We can see Status: true and Type: Ready, which show us that the ClusterIssuer is correct and working as we need it to.
Next, we can check the production ClusterIssuer.
$ kubectl describe clusterissuer laravel-in-kubernetes-production
[...]
Status:
  Acme:
    Last Registered Email:  chris@example.com
    Uri:                    XXX
  Conditions:
    Last Transition Time:  2021-09-22T21:06:20Z
    Message:               The ACME account was registered with the ACME server
    Observed Generation:   1
    Reason:                ACMEAccountRegistered
    Status:                True
    Type:                  Ready
Events:                    <none>
We can see that it too was created successfully.
Now, we can add a certificate to our ingress.
Fixing a small issue with Kubernetes
There is an Existing bug in Kubernetes propagated through to DigitalOcean, which we need to fix first in our cluster though.
Quick description of the problem.
When we add the certificate, the cert-manager will deploy a endpoint which confirms we own the domain, and then do some validation with Let's Encrypt to issue the certificate.
The current problem is we cannot reach the LoadBalancer hostname from inside the cluster, where cert-manager is trying to confirm the endpoint.
This means it cannot validate that the domain is ours.
The solution to this is to not use the IP as our LoadBalancer endpoint in the Service, but rather the actual hostname
We need to update the Ingress Controller's Service with an extra annotation to update it's external hostname to whatever domain we have assigned to it.
In the ingress-controller/controller.yml file, search for LoadBalancer to find the service, and add an extra annotation for the hostname
[...]
---
apiVersion: v1
kind: Service
metadata:
  annotations:
    service.beta.kubernetes.io/do-loadbalancer-enable-proxy-protocol: 'true'
    # We need to add this annotation for the load balancer hostname to fix the bug
    # Replace it with your domain or subdomain
    service.beta.kubernetes.io/do-loadbalancer-hostname: "laravel-in-kubernetes.chris-vermeulen.com"
  labels: [...]
  name: ingress-nginx-controller
  namespace: ingress-nginx
[...]
Now we can apply that, and check that it's working correctly.
$ kubectl apply -f ingress-controller/controller.yml
[...]

$ kubectl get svc -n ingress-nginx
NAME                                 TYPE           CLUSTER-IP       EXTERNAL-IP                                 PORT(S)                      AGE
ingress-nginx-controller             LoadBalancer   10.245.228.253   laravel-in-kubernetes.chris-vermeulen.com   80:30173/TCP,443:31300/TCP   9d
You'll see that the external ip is now the hostname pointing at our LoadBalancer.
The certificate issuing will now work as we expect it to.
Add certificates to Ingress
Issuing staging certificate
Next, let's update the ingress, using the staging ClusterIssuer to make sure the certificate is going to be issued correctly.
We need to add 3 things to the webserver/ingress.yml.
We need to add an annotation with the cluster-issuer name, a tls section configuration, and a host to the Ingress rules.
Remember to change the URLs to your domain or subdomain.
apiVersion: networking.k8s.io/v1
kind: Ingress
metadata:
  name: laravel-in-kubernetes-webserver
  annotations:
    # We need to add the cluster issuer annotation
    cert-manager.io/cluster-issuer: "laravel-in-kubernetes-staging"
spec:
  # We need to add a tls section
  tls:
  - hosts:
    - laravel-in-kubernetes.chris-vermeulen.com
    secretName: laravel-in-kubernetes-tls
  ingressClassName: nginx
  rules:
  # We also need to add a host for our ingress path
  - host: laravel-in-kubernetes.chris-vermeulen.com
    http: [...]
We can now apply the Ingress, and then have a look at the certificate generated to make sure it's ready.
$ kubectl apply -f webserver/ingress.yml
ingress.networking.k8s.io/laravel-in-kubernetes-webserver configured

# Now we can check the certificate to make sure it's ready
$ kubectl get certificate
NAME                                READY   SECRET                              AGE
laravel-in-kubernetes-ingress-tls   True    laravel-in-kubernetes-ingress-tls   37s
If your certificate is not showing up correctly, or not marked as ready after a minute or so, you can consult the TroubleShooting guide for ACME cert-manager
Issuing the production certificate
If everything is working correctly, you will need to delete the ingress, and recreate it, as we need to recreate the certificate secret, and just an annotation change will not be enough to reissue a production certificate, and recreate the certificate.
So as a first step, let's delete the Ingress.
$ kubectl delete -f webserver/ingress.yml
ingress.networking.k8s.io "laravel-in-kubernetes-webserver" deleted
Next, let's update the Ingress annotation to the production issuer.
In webserver/ingress.yml, update the annotation for issuer
apiVersion: networking.k8s.io/v1
kind: Ingress
metadata:
  name: laravel-in-kubernetes-webserver
  annotations:
    # Update to production
    cert-manager.io/cluster-issuer: "laravel-in-kubernetes-production"
spec:
  [...]
Next we can recreate the Ingress, and a certificate will be issued against the production Let's Encrypt, and we should then have HTTPS in the browser when we open the URL.
$ kubectl  apply -f webserver/ingress.yml
ingress.networking.k8s.io/laravel-in-kubernetes-webserver created

$ kubectl get certificate
NAME                                READY   SECRET                              AGE
laravel-in-kubernetes-ingress-tls   True    laravel-in-kubernetes-ingress-tls   11s
We now have a production certificate issued by cert-manager through Let's Encrypt, and you should see the lock in your browser without any issues.
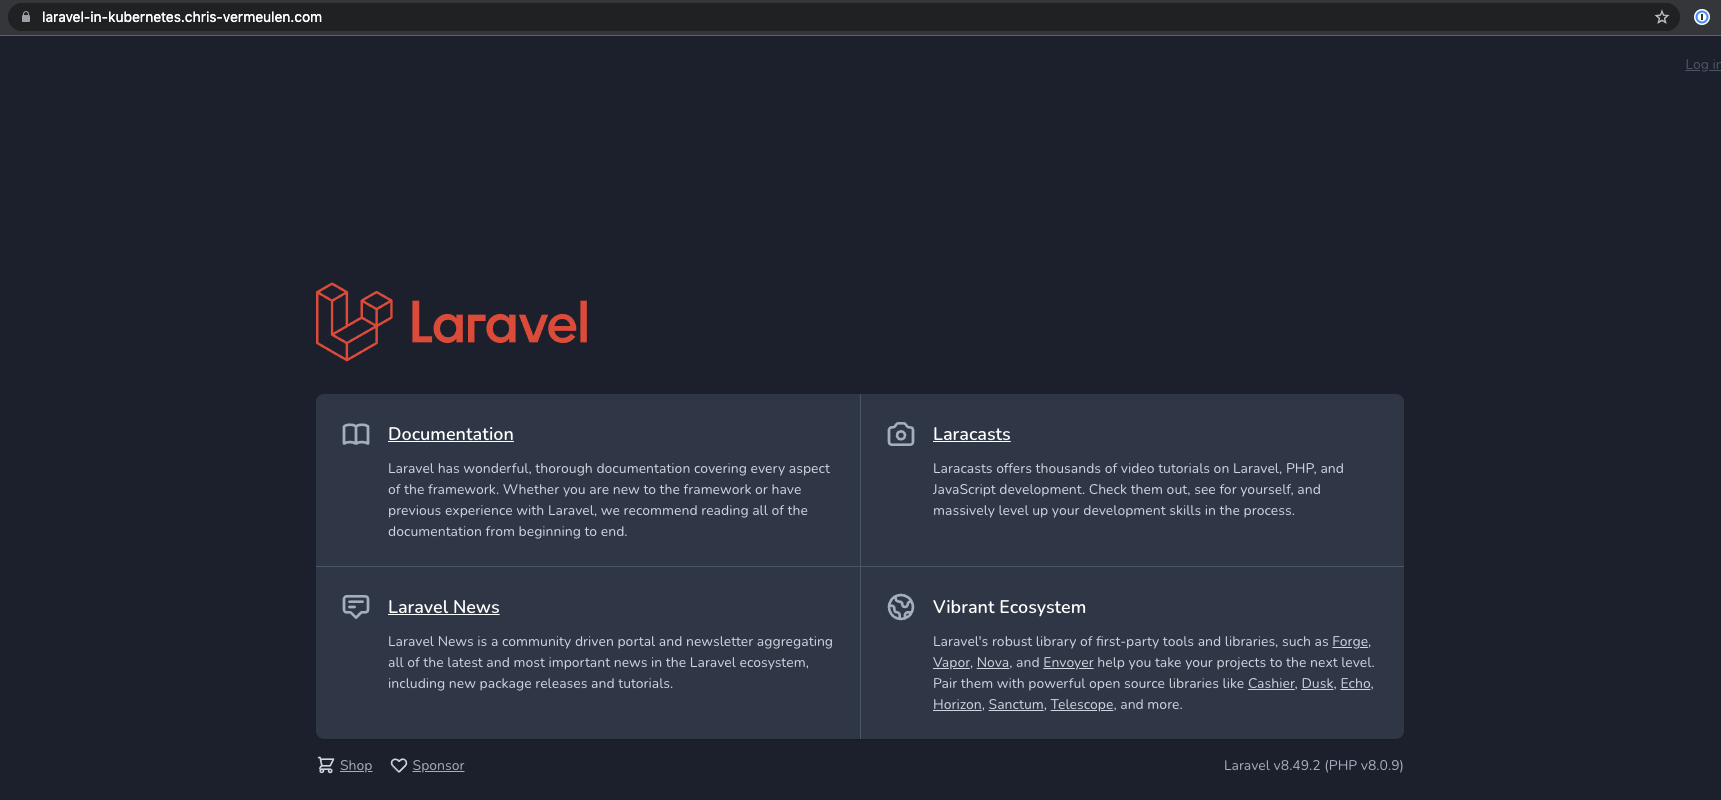
We now have certificates setup and working and our site is secure for people to connect to and do stuff, whatever that may be.
Next, we are going to move onto distributed logging, so we can easily catch all the logs from our applications in an easily searchable place.